How to Make a Cross Stitch Stocking
 Personally, I prefer making s cross stitch stocking by using a purchased kit. It is a great place to start! Most kits include the pattern, floss, the aida cloth, personalization instructions, a needle, trims and sometimes the backing cloth.
However, there are a few things you will need in addition to the kit, and a few finishing techniques that you will need to know to complete your project.
I am going to cover the steps for sewing and finishing a cross stitch stocking here, but first I want to start with a few cross definitions and descriptions to help you select the right kit.
Covering the Basics First
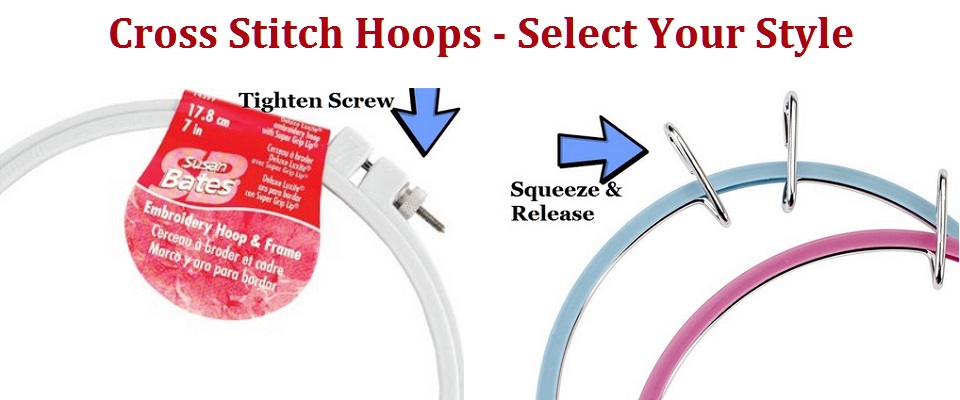
Cross Stitch is one of the easiest embroidery stitches. As a matter of fact, you do not need to know how to embroider to learn how to cross stitch. Most likely you already know that cross stitch is basically a row of X’s made with floss (thread) on aida cloth fabric for counted cross stitch or regular fabric that has the pattern of X’s stamped directly on it (stamped cross stitch).
Make sure you know which type of kit you are purchasing and which style you prefer. The Aida cloth for counted cross stitch has holes in it. You use a pattern to count the holes to know where to place each stitch. With a counted cross stitch kit, there is no pattern printed on the fabric which allows you to alter the pattern if desired.
The stamped cross stitch material does not have holes, but you still may need a pattern for reference. Also, you cannot alter the pattern. The stamped pattern would still show whether you cover it with thread or not.
Supplies You Need in Addition to the Kit
- A Sewing Machine
- Iron
- Scissors
- An Embroidery Needle (if not included in the kit)
- Interfacing or Fusible Web Material to Give the Material Stability
- Regular Thread to Sew the Stocking Pieces Together
- Bias Tape (for the top opening)
- Batting
- Backing Material for Back of Stocking and for the Hanger
- Spray Adhesive (*optional, but helps by holding the batting and backing together while machine sewing)
Directions for Finishing Your Stocking
After you have cross stitched the front piece of the stocking, you will need to assemble the actual stocking. Read these instructions and follow them carefully. You don’t want to do anything permanent that will destroy your beautiful needlework.
- Cut the stitch aida cloth to the shape of the stocking. Leave a 1 inch seam allowance. (a pattern for the stocking should be in the kit)
- Cut & Fuse the Fusible Web to the back of the stocking front. This will permanently hold the cross stitches in place, protect the stitches from being pulled by items placed in the stocking later, as well as add stability to the finished piece.
- Sew the bias tape on the back top of the stocking front to protect the top opening.
- Cut the stocking back from purchased material.
- Cut the batting using the pattern.
- Use the *spray adhesive to hold the batting to the backside of the back material
- Sew the Batting to the Back. You can use a pretty quilt design here if desired.
- Fold the top of the back, at the stocking opening, over twice to the inside to hide the raw edges and stitch down.
- Make your material loop hanger and attach it to the front inside of the stocking
- Place the right sides together, front and back, and sew them together.
- Trim your seams
- Turn your stocking right side out and iron it.
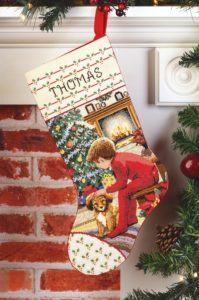
The Featured Kit – Waiting for Santa Cross Stitch Kit

For a Selection of Cross Stitch Stocking Kits, Click Here!